How to use AI Comment Assistant
A step-by-step walkthrough of the plugin popup, site profiles, prompt settings, link imports, and your account page. If you haven't installed the extension yet, start here.
1. The plugin popup
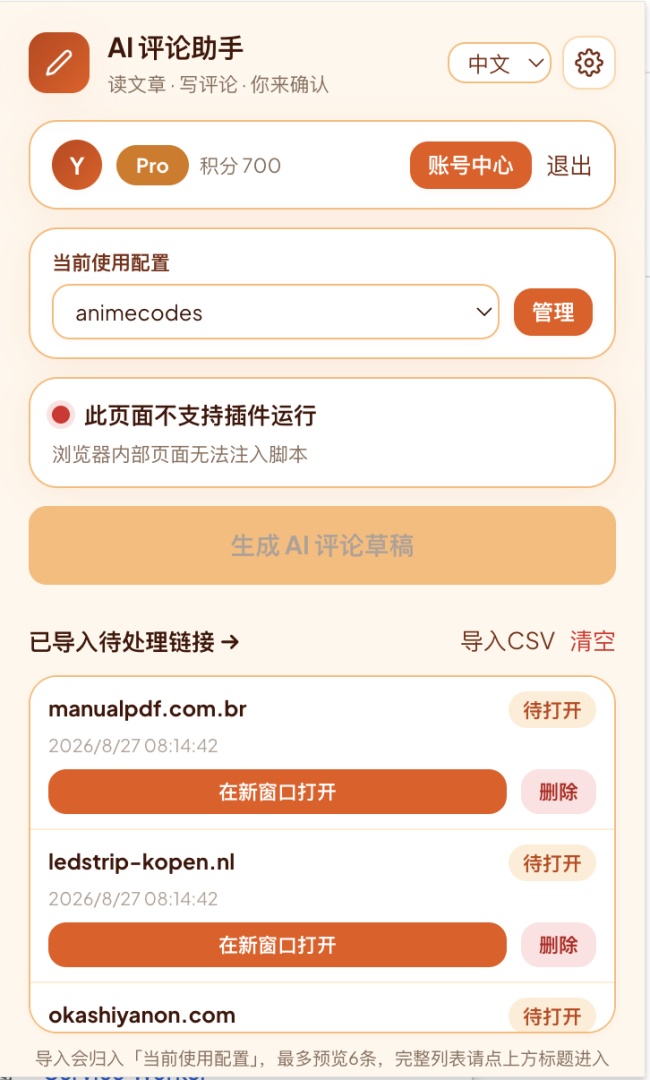
After installing the extension, click the AI Comment Assistant icon in your browser toolbar. The popup is your main control panel while browsing.
- Header — your avatar, Pro badge, remaining credits, and buttons for Account Center and Log out.
- Current profile — choose which site profile the comment should be written for. Click Manage to jump to the site configuration page.
- Generate AI Comment Draft — the main button. It reads the article on the current tab and drafts a comment in your configured style.
- Imported pending links — links imported from CSV for the current profile. Each link shows its status (e.g. Pending open) and actions to open in a new window or delete. The popup only previews the latest 6; use the title to open the full list.
The extension can only run on regular web pages. On browser-internal pages like chrome://extensions/ you'll see a "This page does not support plugin execution" message and the generate button will be disabled.
2. Setting up a site profile
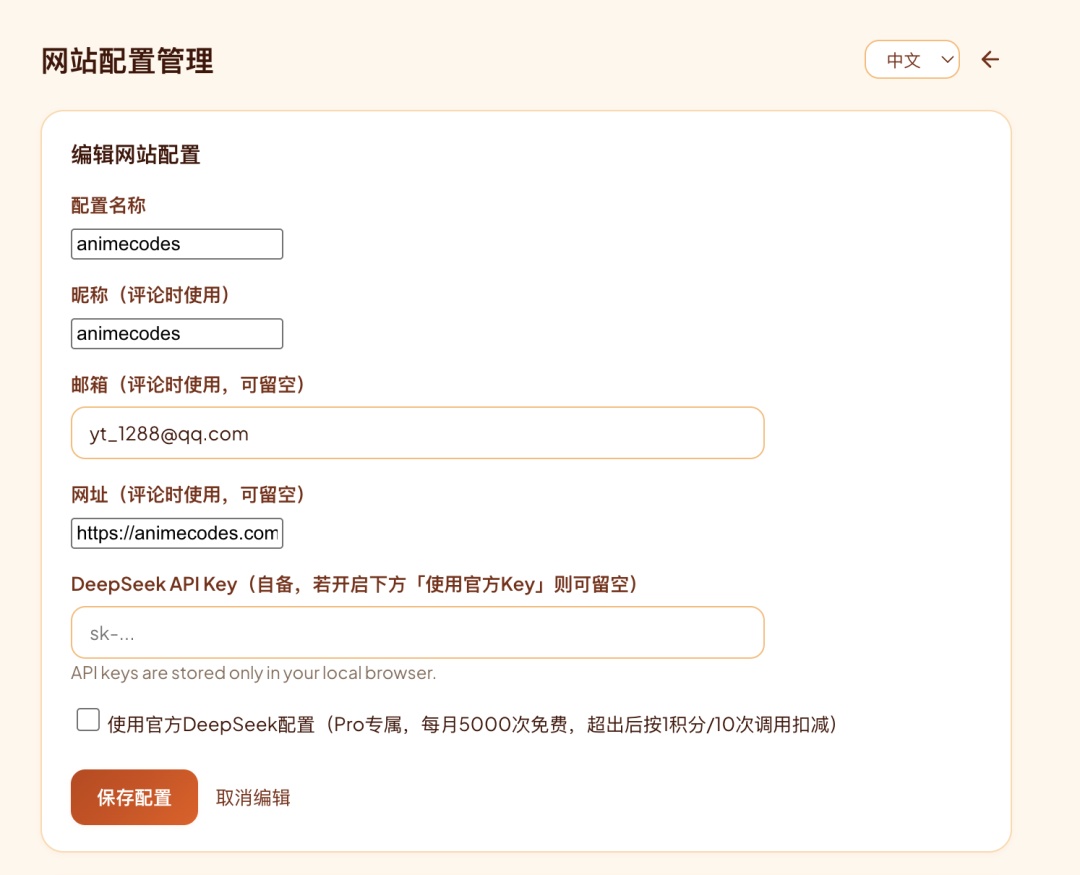
A site profile stores the identity you use when commenting: your nickname, email, website URL, and DeepSeek API key. You can have multiple profiles for different brands or projects.
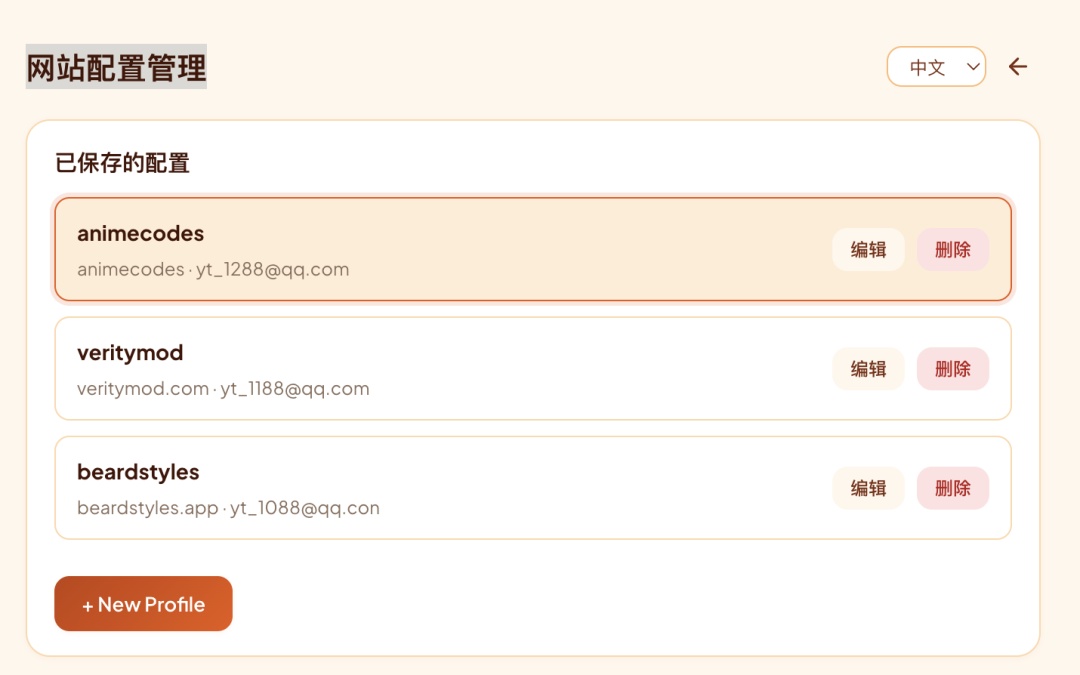
- Open the site configuration page from the popup by clicking Manage, or navigate directly to
chrome-extension://jgofpakfcgpindepppfpkhhjfialjhcm/sites.html. - Click + New Profile to add a profile, or click Edit next to an existing one.
- Fill in the fields:
- Profile name — internal label, e.g.
animecodes. - Nickname — the display name used in the generated comment.
- Email — optional, used when the comment form asks for an email address.
- Website — your site URL. The prompt will embed this as a backlink anchor in the comment.
- DeepSeek API Key — your own key. If you enable Use official DeepSeek config (Pro only), you can leave this empty.
- Profile name — internal label, e.g.
- Click Save Profile.
Pro users: enable Use official DeepSeek config to use the project's built-in DeepSeek quota instead of your own key. You get 5,000 free calls per month; after that, 1 credit is deducted for every 10 extra calls.
3. General settings & prompt template
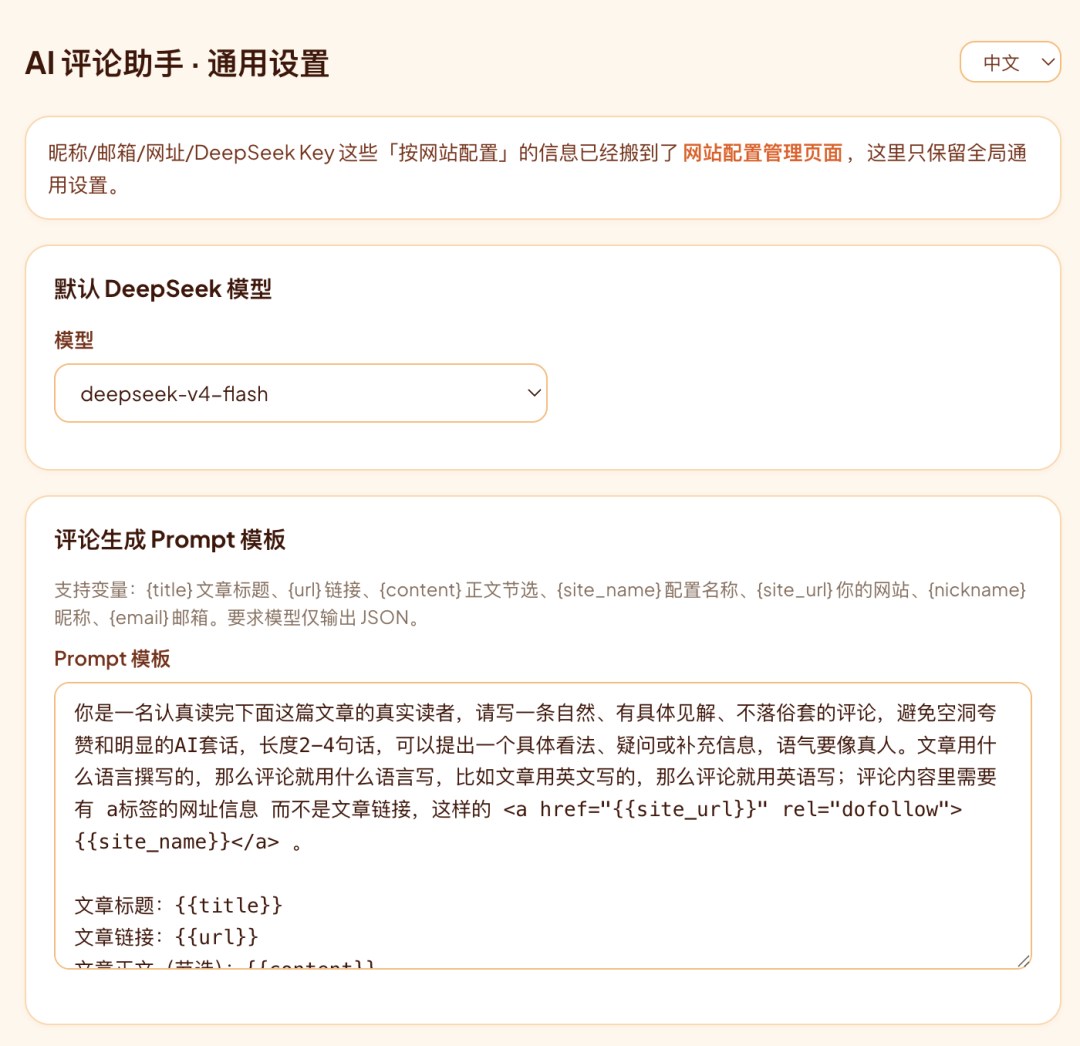
Open the general settings page at chrome-extension://jgofpakfcgpindepppfpkhhjfialjhcm/options.html. This page stores global settings that apply across all profiles.
- Default DeepSeek model — choose the model used for generation, e.g.
deepseek-v4-flash. - Comment generation prompt template — customize the system prompt sent to the model. The default prompt asks for a natural, insightful, 2–4 sentence comment that matches the article's language and includes a dofollow backlink anchor to your configured site.
You can use these variables in the prompt:
{title}— article title{url}— article URL{content}— excerpt from the article body{site_name}— current profile name{site_url}— current profile website{nickname}— current profile nickname{email}— current profile email
The prompt must instruct the model to output JSON only, because the extension parses the response to extract the comment text.
4. Generating a comment
Once a profile is ready, writing a comment takes a few seconds:
- Open the article or blog post you want to comment on in a normal browser tab.
- Click the AI Comment Assistant toolbar icon.
- Confirm the correct profile is selected in the Current profile dropdown.
- Click Generate AI Comment Draft.
- Review the draft, edit it if needed, and submit it through the page's comment form.
Each generation consumes 1 credit (or counts against your official DeepSeek quota when that option is enabled). Free users receive a daily credit allowance; Pro subscribers and credit packs are available from the Account page.
5. Managing imported links
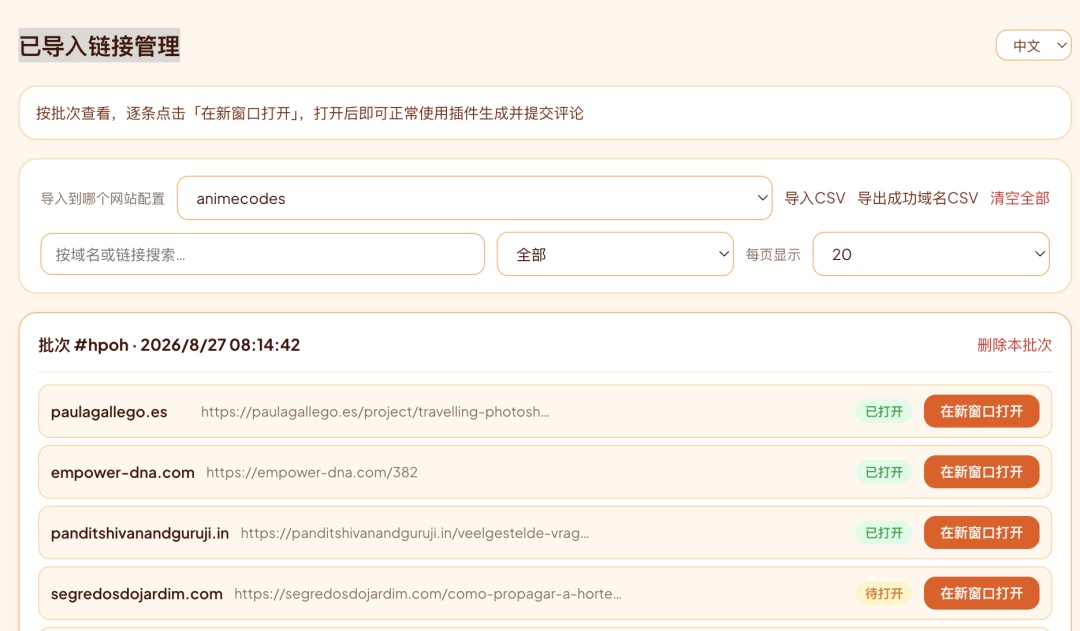
The imported links page (chrome-extension://jgofpakfcgpindepppfpkhhjfialjhcm/links.html) is where you work through a list of target articles in batches.
- Import CSV — upload a CSV of URLs. Imported links are attached to the currently selected profile.
- Open in new window — click this on any link to open the article in a new tab, then generate and submit your comment.
- Status — links show whether they have been opened (Opened) or are still pending (Pending).
- Export successful domains CSV — download the domains you've successfully commented on.
- Delete batch / Clear all — remove an entire import batch or clear the whole list.
CSV format requirements
The CSV you upload must contain at least the first three columns in the exact order below. Extra columns are ignored.
- # — serial number / row index (numeric).
- Domain — the target domain, e.g.
paulagallego.es. - Link — the full article URL, e.g.
https://paulagallego.es/project/travelling-photoshoot/.

Do not delete, swap, or leave blank the first three columns. The parser reads column 2 as the domain and column 3 as the article URL.
6. Account, plan & credits
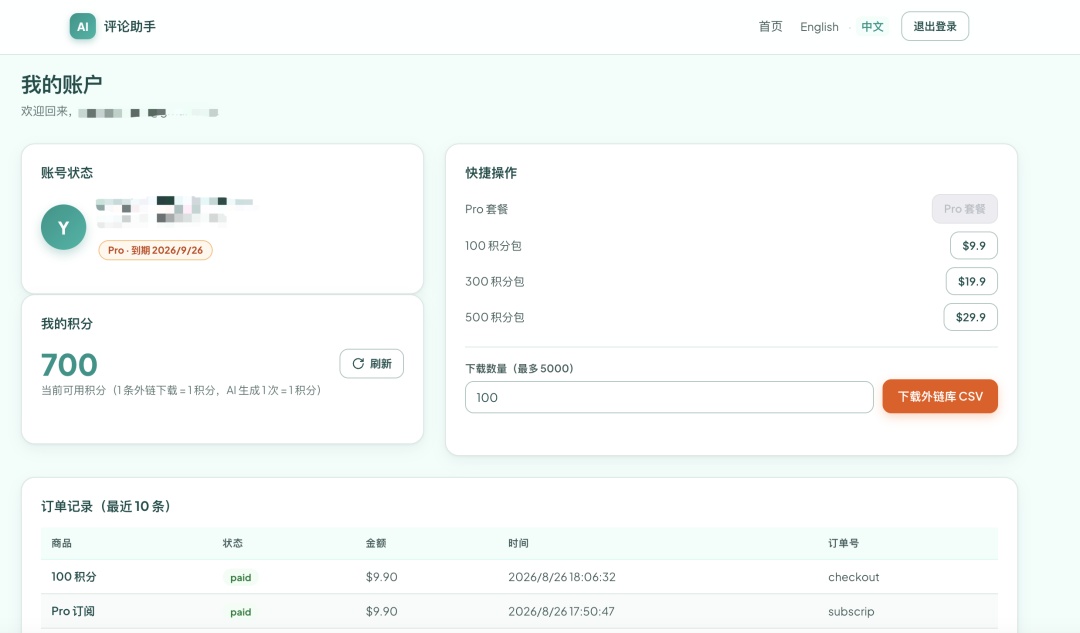
Your account is managed on the web at https://blogreplyai.com/account. From here you can:
- View plan status — see whether you're on Free or Pro and your Pro expiration date.
- Check credits — current balance, with a note that 1 AI generation = 1 credit and 1 link download = 1 credit.
- Upgrade or buy credits — choose Pro subscription or credit packs (100 / 300 / 500).
- Download link library CSV — export up to 5,000 domains from the official domain pool; the deducted credits match the number of rows downloaded.
- Order history — review past payments and statuses.
Credits are shared across the extension and the web account. Purchases made from the popup or the account page update the same balance.
7. Quick tips
- Match the profile to the project. Each profile keeps its own nickname, site URL, and imported links. Switch profiles when commenting for a different brand.
- Don't run on internal pages. The extension only injects on regular web pages;
chrome://URLs and browser settings pages are unsupported. - The backlink is part of the prompt. The default template inserts your site as a dofollow link using your profile's
site_urlandsite_name. Make sure those fields are filled in. - Official DeepSeek vs. your own key. Pro users can use the built-in quota and skip entering a personal API key. Free users must provide their own DeepSeek key in the profile.
- CSV imports are per-profile. When importing links, select the correct profile first so credits and exports stay organized.